
As my before article of the Princess and the Pea doll was the most viewed on my blog. I thought the best would be to share this project with you as this year's early christmas present from me to you. Hope you will enjoy making this real Sweety Pie!!! I cannot wait to see the the results.

What you will need:
4 smaller pieces of same colored or themed fabric /approx.
50cm * 50cm squares
1 skin colored square of fabric /approx. 50cm * 50cm square
1 white colored square of fabric /approx. 50cm * 50cm square
1 pearl any color
Doll hair, or fluffy yarn.
Small crown
Self healing board and cutter or a scissor
Stuffing
Ribbon
Safety pin
Instructions:
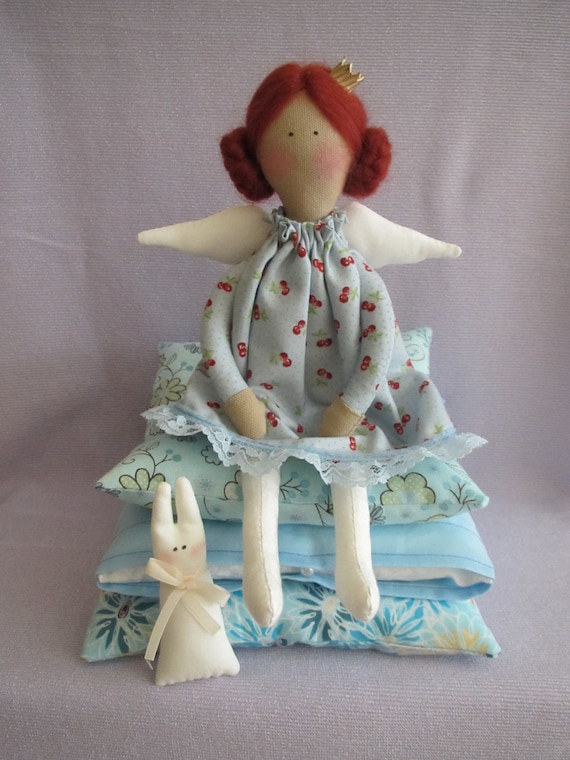
Cushions:
Print the pattern. ( If you need to you can adjust it with a
photocopier)

Take your colored fabrics and cut two (one from a lighter
colored fabric) 18cm*18cm square, one 19cm*19cm square, 20cm*20cm square. Sew
the 18cm*18cm squares up with the right side facing each other leaving a small
opening for turning out and stuffing.
Turn them inside out stuff and sew the opening up. Hem one side of the
19cm*19cm square sew up the sides as above. Stuff, with one of the 18 cm pillow
and attach the pearl onto the side. Sew the 20cm*20cm square up with the right
side facing each other leaving a small opening for turning out and
stuffing. Turn inside out stuff and sew
the opening up. Place pillows on top of each other and fasten them together in
the very middle.
If you want to sew cases for the pillows tale off 0,5 cm of the original pilowsizes. 6so the 18cm*18cm square case will hold a 17,5*17.5 cm pillow.
Doll:
Trace body onto skin colored fabric. Trace legs and wings
onto white fabric. For the hands you will need a 2* 12cm*12cm color fabric and
a 2*4cm*12cm skin colored fabric. Sew
the two pieces (one skin and one colored) together put the two fabrics on top
right side facing. Press or Iron down the seam allowance. Trace hands onto the
fabric sewn together with the top of the hand on the skin colored fabric. Make
sure that the fabrics are exactly on top of each other and are the same size.

Sew all parts with opening turn and stuff. Legs to be sewn
into the body by inserting them into the lower still open body part. It is
better to fasten them with pins and sew by hand and only after that sew by the
machine. The hands have to be sewn from the outside. For this finish the hands
by stuffing and sewing in the opening, than pin it onto the body and sew it on
with hand.
Dress:
Cut a 14cm *14cm *2 square of a colored fabric. Sew on one
side together leaving 2 cm free on top and
iron seam allowance. Hem the bottom. Hem the top with 1cm allowance so you can
drive a smaller pin through it. Secure the ribbon with the pin and pull it through
the hem hole .Sew up the side of the dress don’t forget to leave a hole for the
arms on both sides. Dress your doll. Pull the ribbon on the top of the dress
cut off extra ribbon.
Hair:
Cut off same size pieces of hair or yarn. Add the hair to
the doll by pinning it onto the head in the way you like it. Sew on the head
and remove pins. You can plait the hair if you want to. Add the crown with a
hot glue.
Wings:
Trace wings onto white fabric sew it up according to the
pattern. Leave a small opening in the
middle of (the bottom of the) fabric and
turn and stuff. Attach to the back of the princess. Add eyes and a bit of redness to the cheeks.
Place doll on pillow you can sew it on as well if you
prefer.

No comments :
Post a Comment